April 8, 2026

How to Install the GrowthOptix Script in Webflow

Written by
Digital Marketing Strategist
Luis Schiffmann
Blog Details Image
Table of Contents

2,000+ merchants have transformed raw Stripe & PayPal data into growth with GrowthOptix. You can too.

Start your free trial

If you're running a SaaS or subscription business on Webflow, tracking what’s actually driving revenue isn’t optional.

You might have traffic coming in, campaigns running, even conversions happening… but without the right setup, it’s hard to see what’s really working and what’s just noise.

That’s where GrowthOptix comes in.

To get the full picture, there are three pieces that work together:

  • The GrowthOptix tracking script (this is what we’ll install here)
  • Your marketing integrations (Google Ads, Meta, LinkedIn, etc.)
  • Your payment gateways, like Stripe or PayPal

The script captures user behavior and attribution data. Your integrations bring in ad spend and campaign context. And your payment gateways connect everything to actual revenue.

When all three are in place, you stop guessing and start seeing how your business actually performs, from click to conversion to revenue.

In this short guide, we’ll focus on the first step: installing the GrowthOptix script on Webflow.

The good news is, it’s quick to set up and doesn’t require Google Tag Manager or any technical setup.

Let’s walk through it.

What the GrowthOptix Script Actually Does

Before getting into the setup, it’s worth understanding what you’re installing.

The GrowthOptix script is what allows the platform to collect the data it needs to work.

Once it’s live, it tracks things like:

  • Page views.
  • UTM parameters.
  • Referrers.
  • Landing pages.
  • User journeys.
  • And ultimately, how all of that ties back to revenue.

This is what makes it possible for FAI to answer questions like:

  • Which ad actually led to a sale.
  • Which campaigns assist conversions over time.
  • Which channels look good but don’t generate revenue.

Without this, you're just looking at surface-level metrics.

Why Webflow Users Often Miss This Step

A lot of Webflow users rely on tools like Google Analytics or ad dashboards.

Those tools are useful, but they have limitations.

They show:

  • Traffic.
  • Sessions.
  • Clicks.

But they don’t fully connect:

  • Long customer journeys.
  • Cross-channel attribution.
  • Revenue back to the original source.

So decisions end up being based on incomplete data.

Installing a proper tracking script early solves that.

When It Makes Sense to Install Without GTM

There are two main ways to install the GrowthOptix script:

If you’re using Webflow, going direct is usually the simplest and cleanest option.

You avoid:

  • Extra layers.
  • Misconfigured tags.
  • Debugging headaches.

Unless you already depend heavily on GTM, adding the script directly is the fastest way to get reliable tracking.

Step 1: Copy Your Script from GrowthOptix

Start inside GrowthOptix.

  1. Log in to your account
  2. Go to Marketing Attribution → Tracking
  3. Click Copy Script

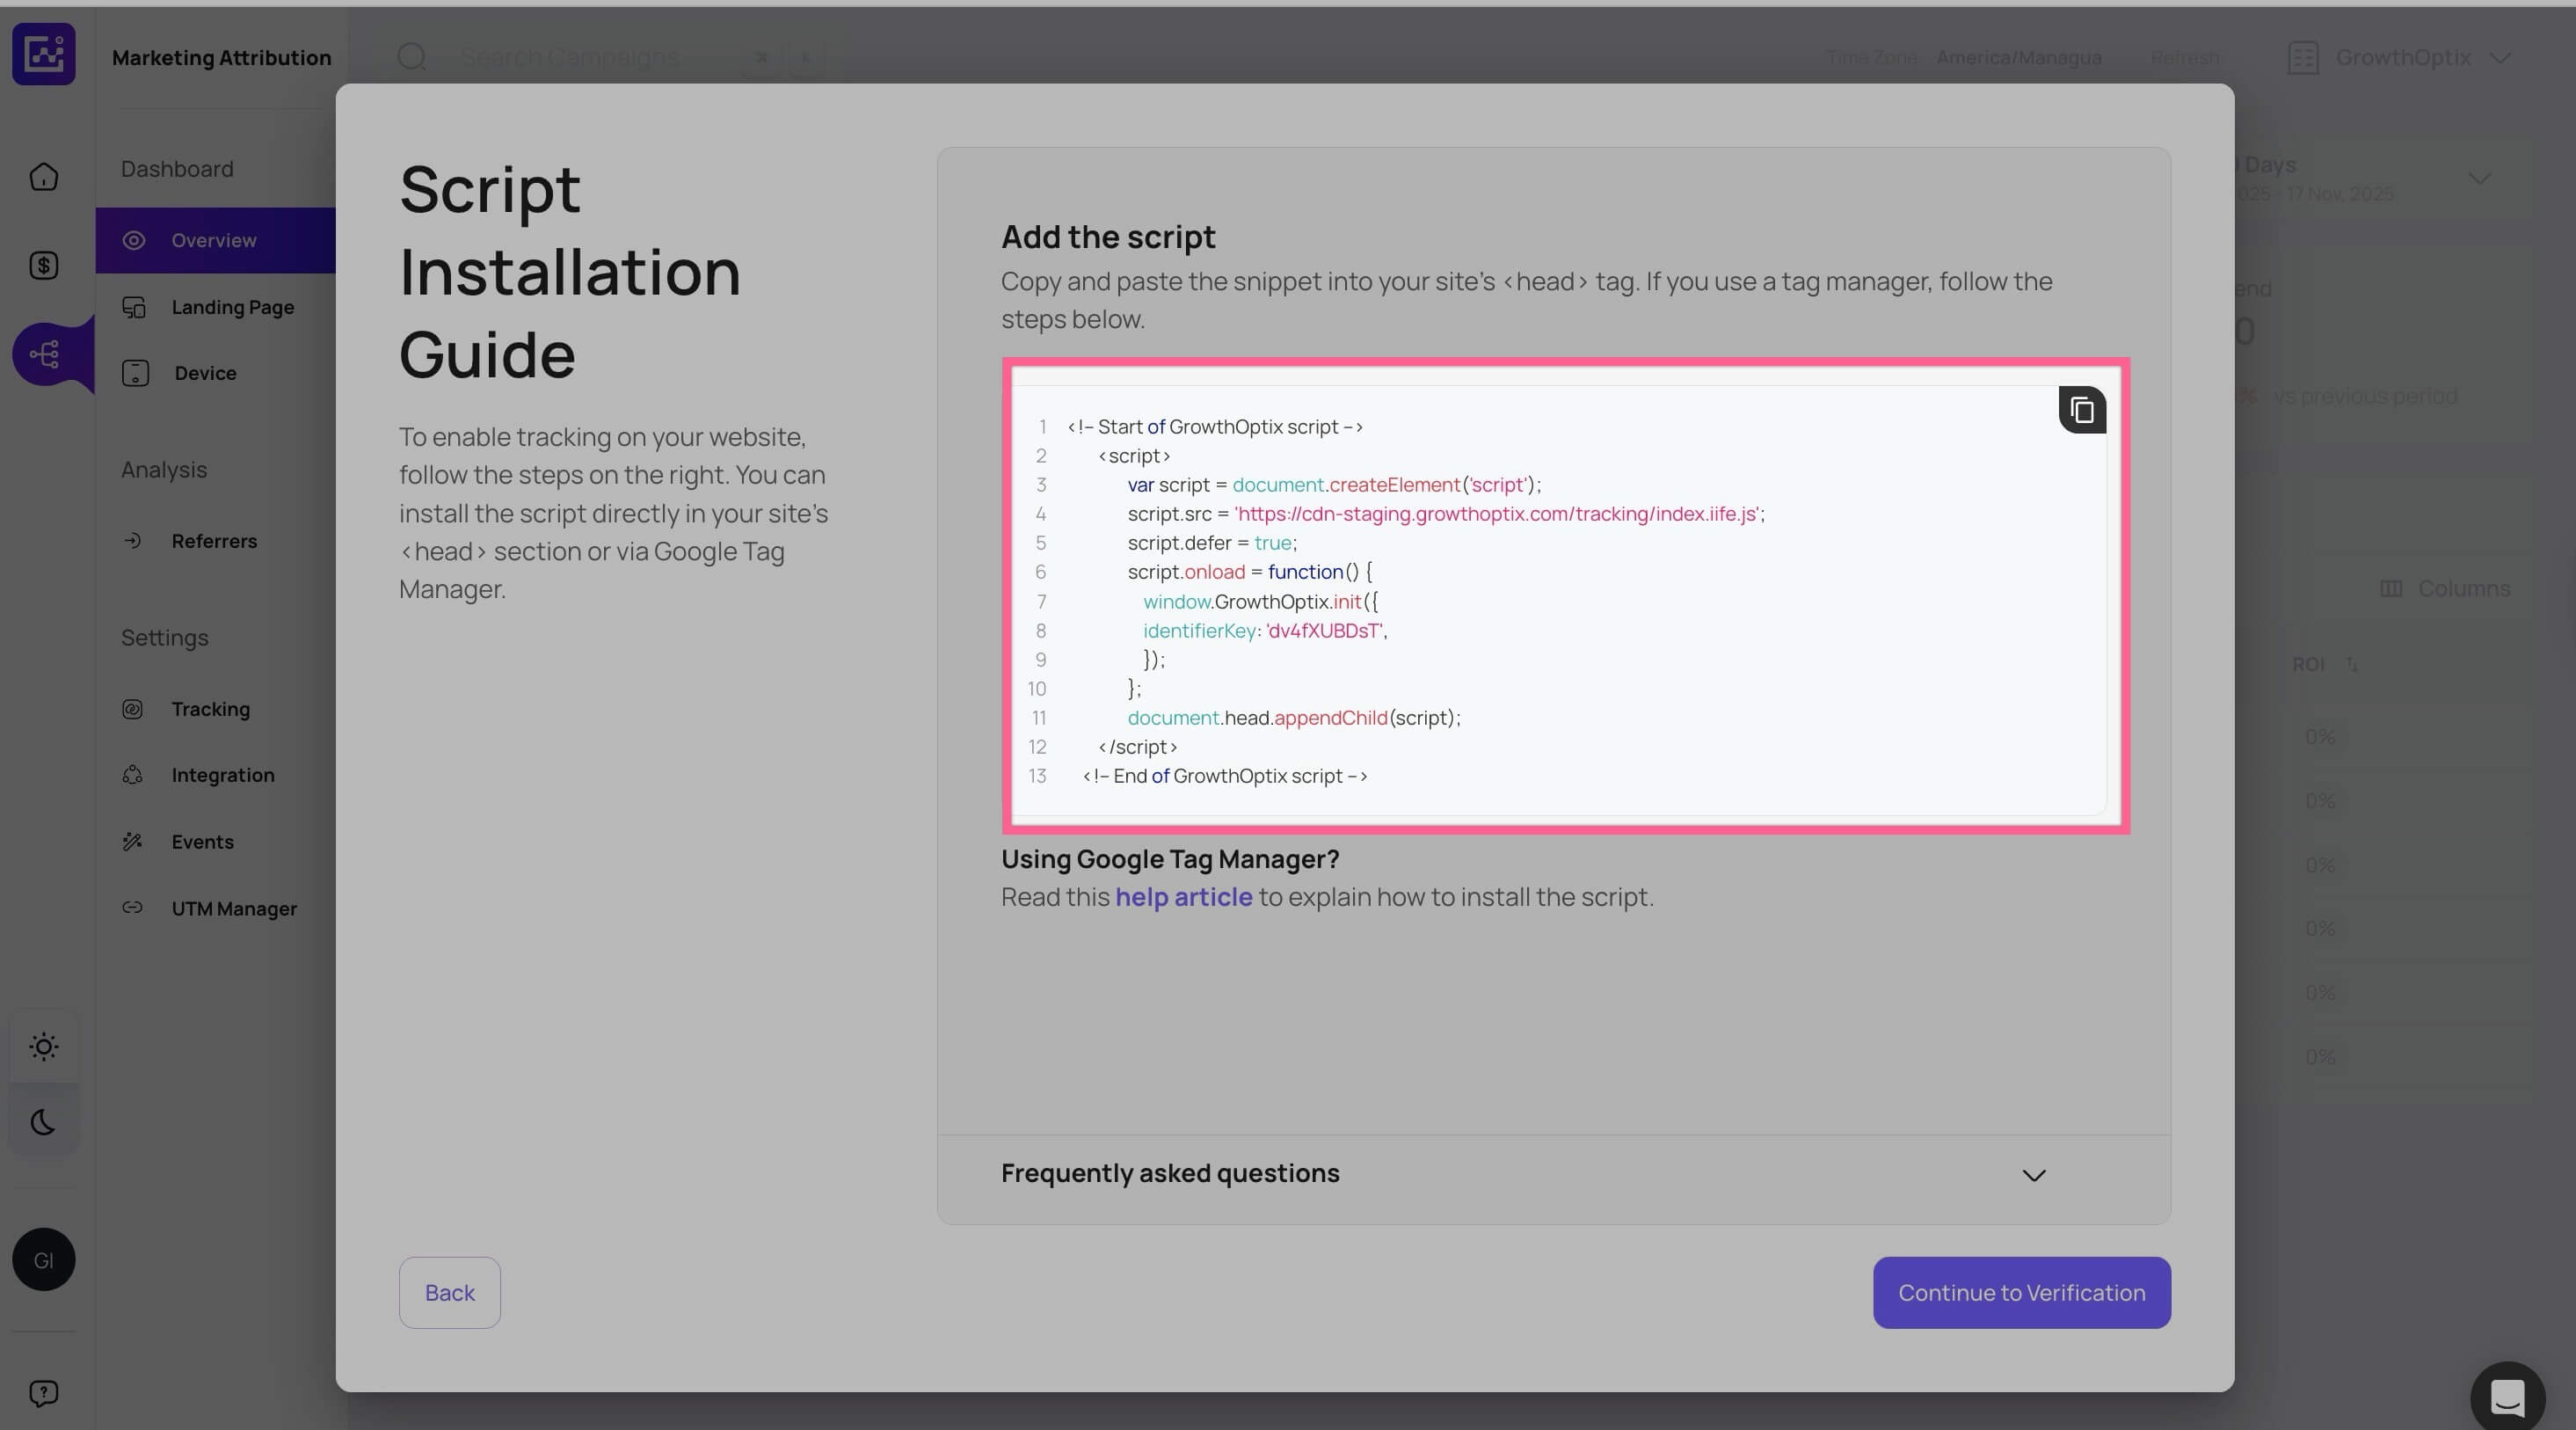
You’ll see a script that looks technical, but you don’t need to understand it.

Just copy it.

One important detail: Each script includes a unique identifier tied to your account.

So make sure you:

  • Use your own script.
  • Don’t copy the example version.

Step 2: Add the Script to Webflow

Now switch to Webflow.

  1. Open your project.
  2. Go to Project Settings.
  3. Click on the Custom Code tab.
  4. Find the Head Code section.
  5. Paste your script there.

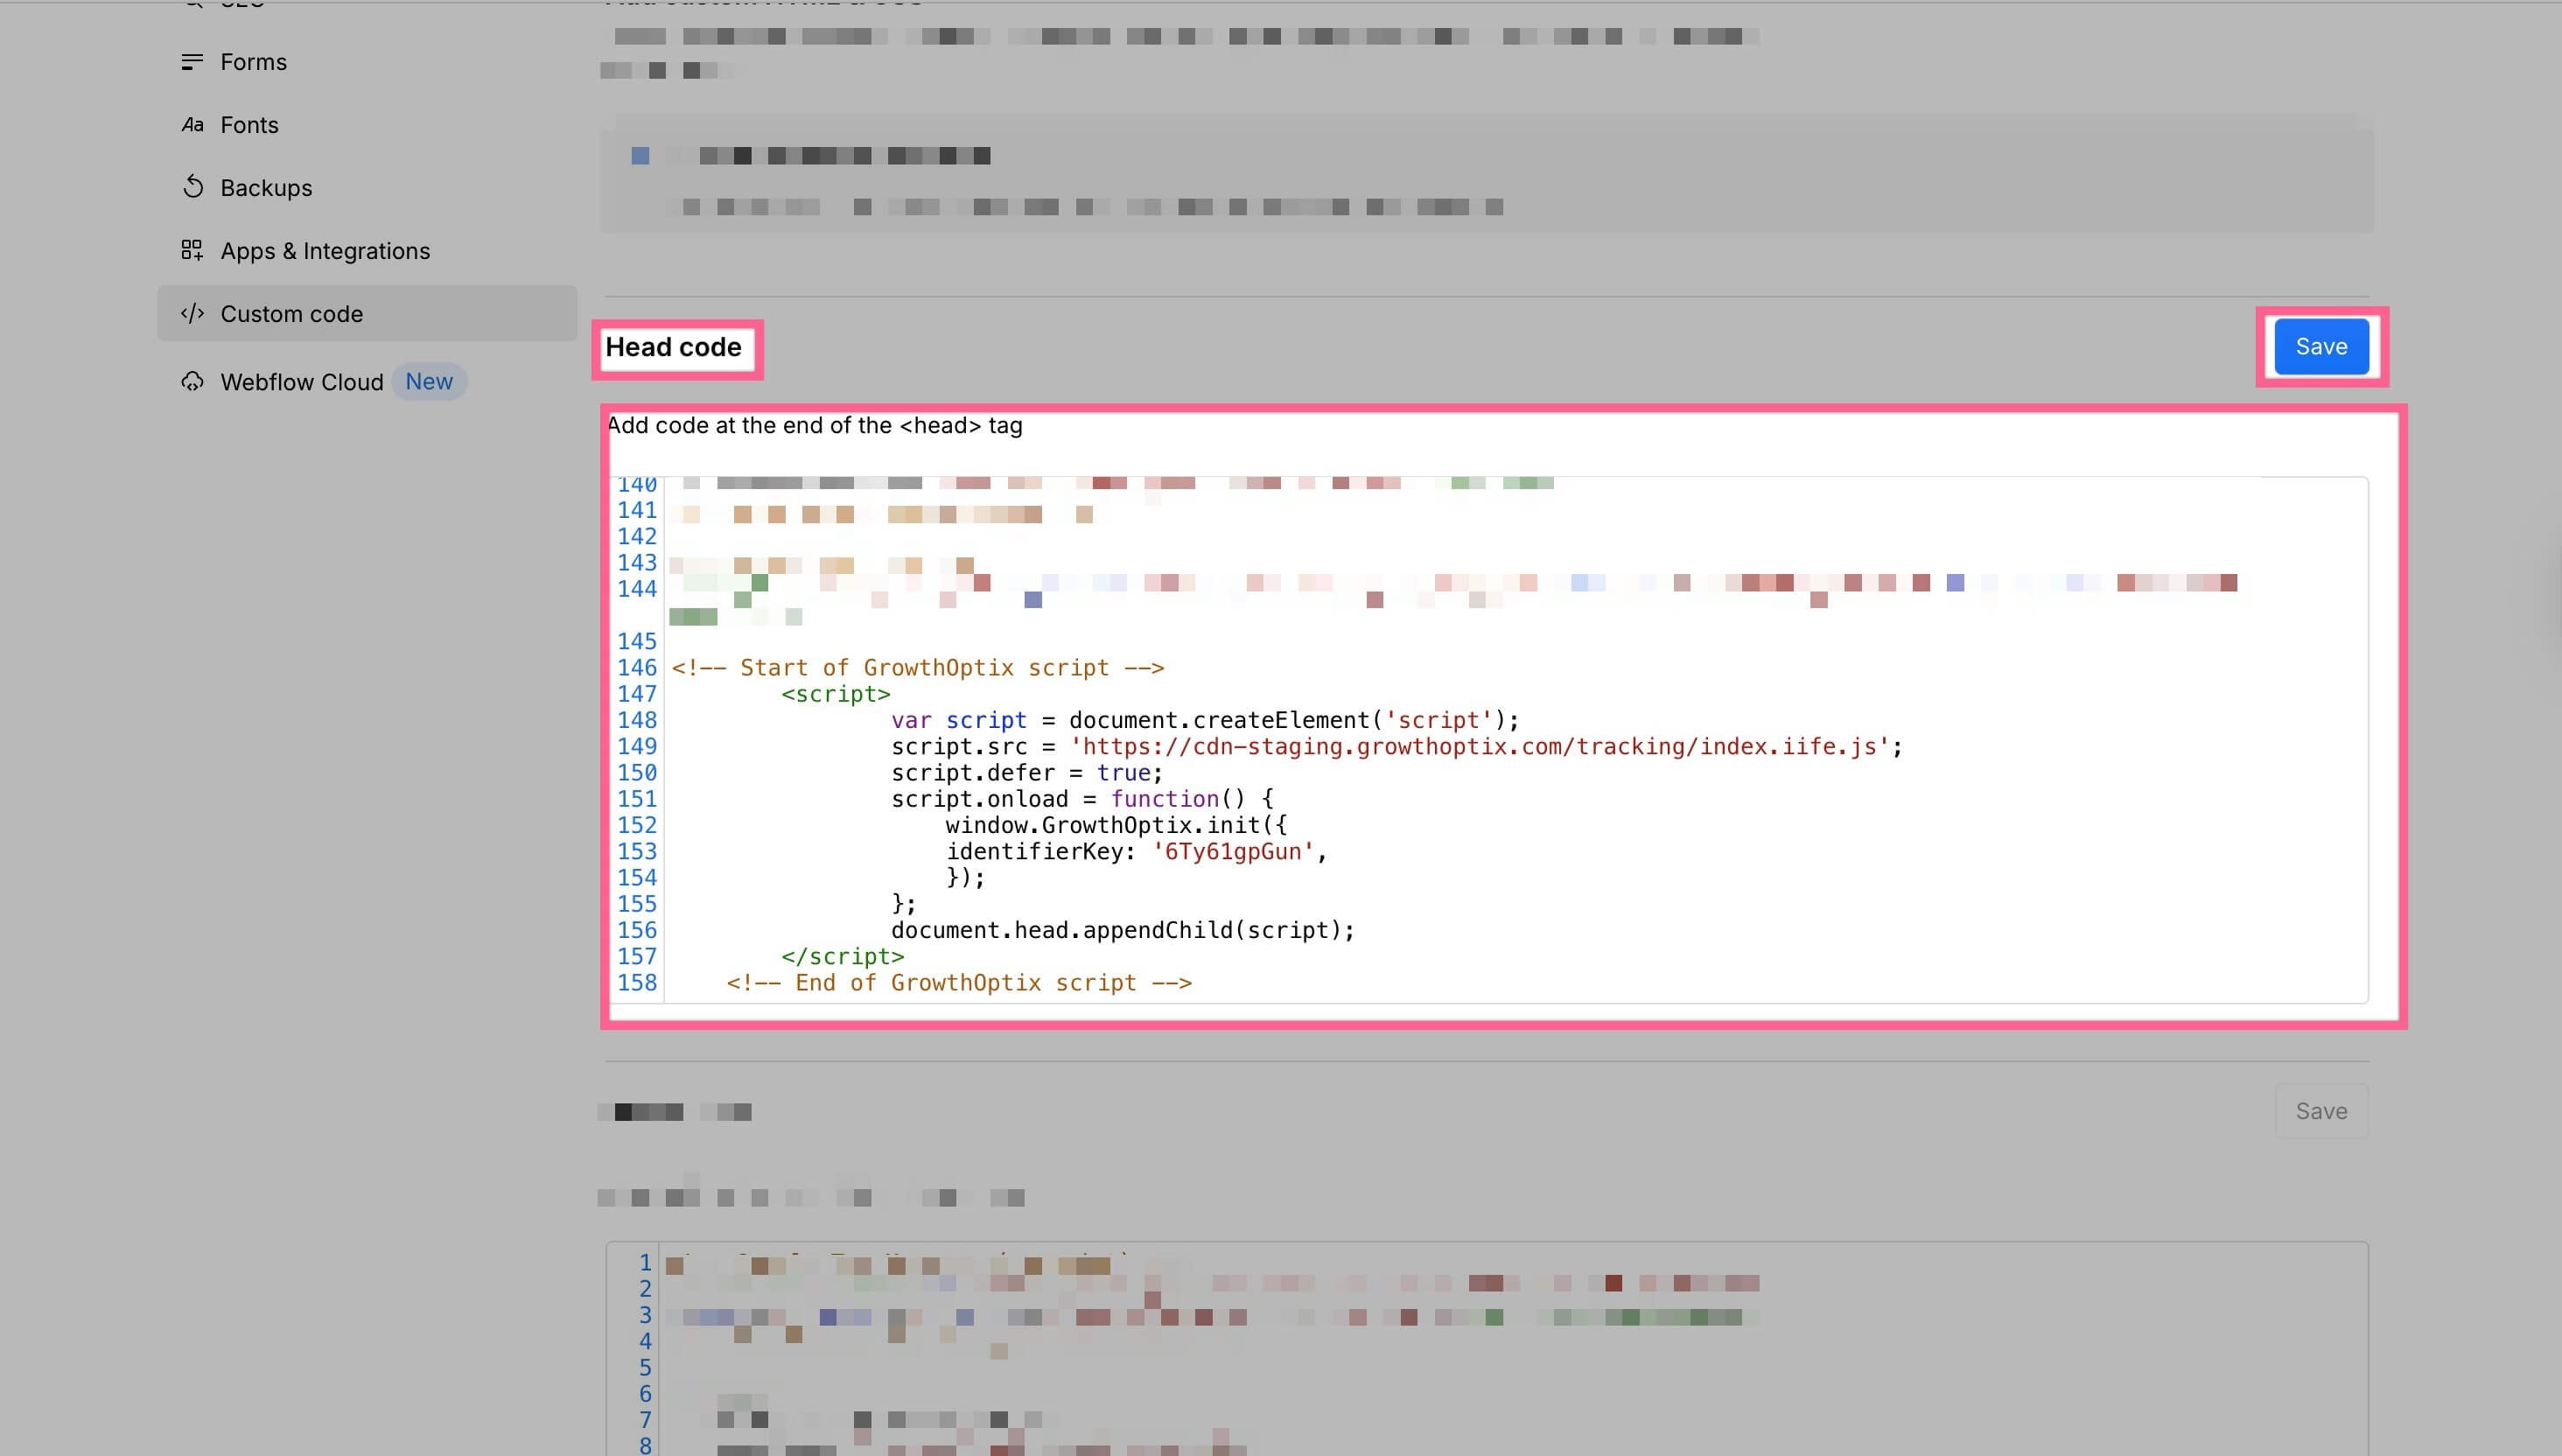
That’s all you need to do.

By adding it here, the script runs across your entire site automatically.

Why the <head> Section Matters

This part is important.

The script should go inside the <head> section, not the footer.

Why?

Because it needs to load before the page content.

That way:

  • It captures attribution data from the start.
  • It doesn’t miss early interactions.
  • It ensures more accurate tracking.

It’s a small detail, but it makes a real difference.

Step 3: Publish Your Site

This is where things often break.

After adding the script:

  • Click Save.
  • Then Publish your site.

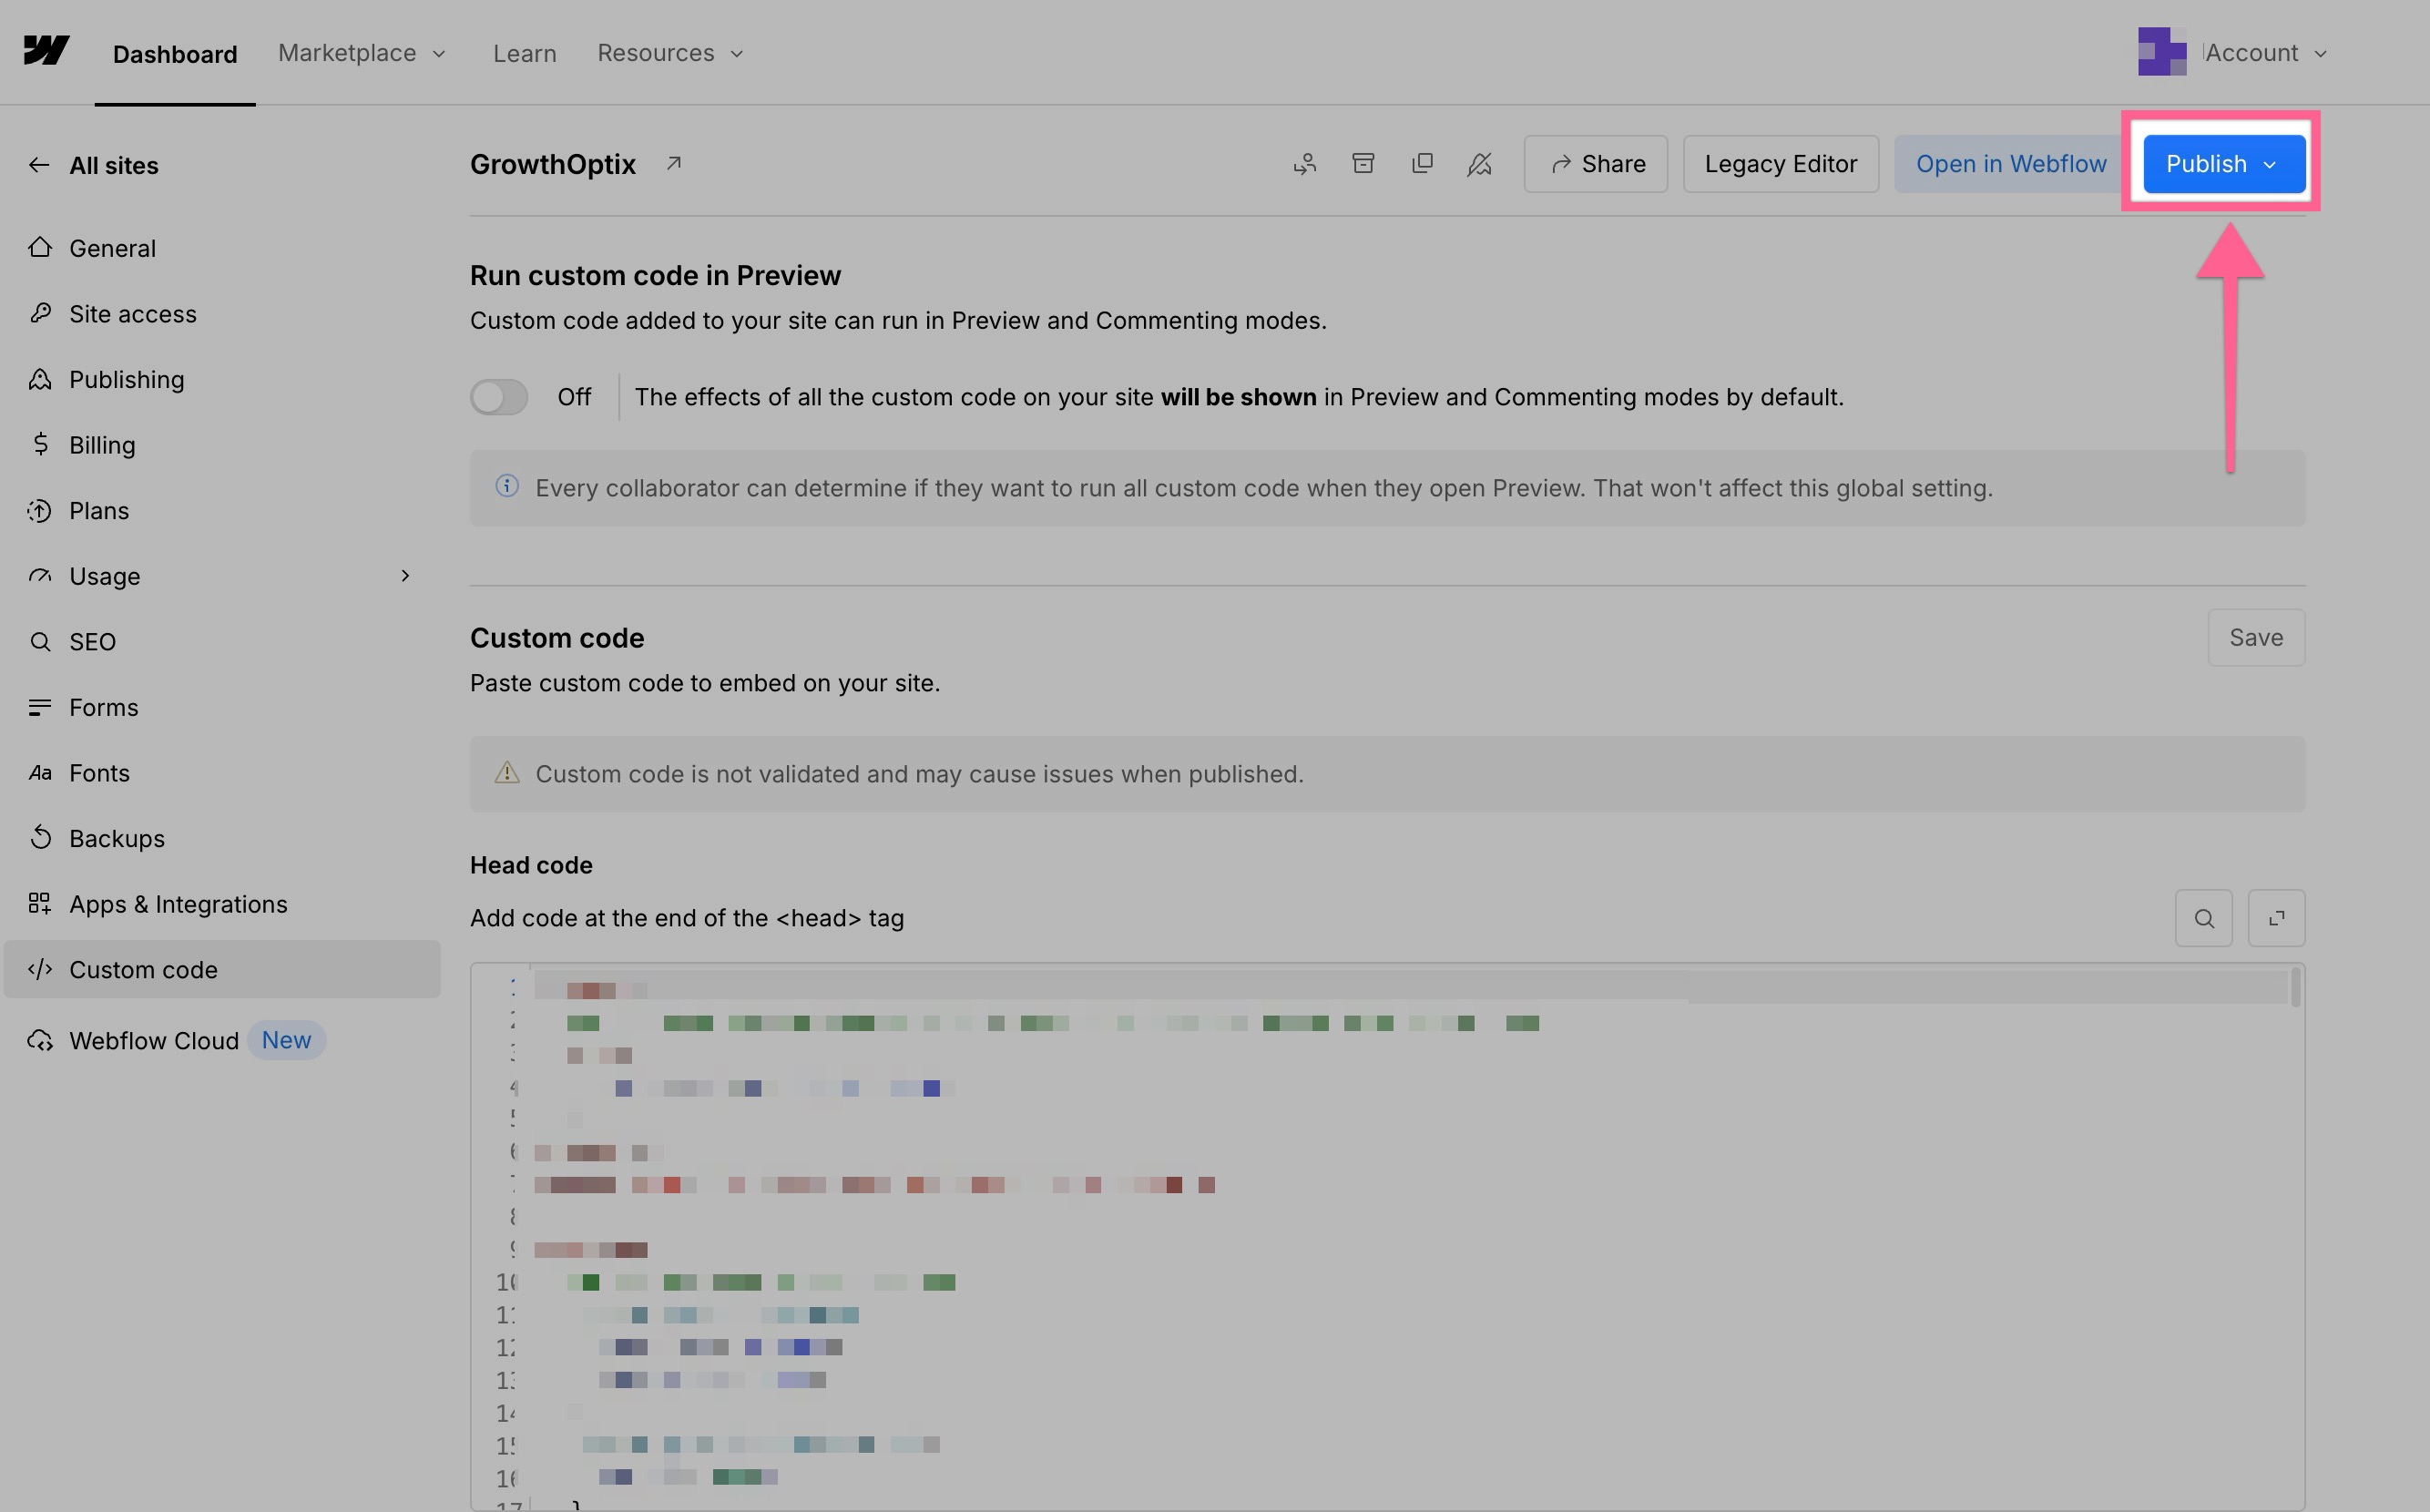
If you skip publishing, the script won’t be live.

Step 4: Verify the Installation

Once your site is live, go back to GrowthOptix.

  1. Navigate to Tracking.
  2. Enter your website URL.
  3. Click Verify.

If everything is set up correctly, you’ll see confirmation that the script is active.

At that point, data starts flowing in.

How to Double-Check Everything Is Working

Even after verification, it’s a good idea to sanity check.

You can:

  • Visit your own site and see if sessions appear.
  • Use a test URL with UTM parameters.
  • Check landing page data after a few visits.

You don’t need to overdo it; just confirm things are being tracked.

What Happens After Installation

Once the script is live, GrowthOptix starts capturing data almost immediately.

But the real value comes when it works together with your integrations, your ad platforms, and payment providers.

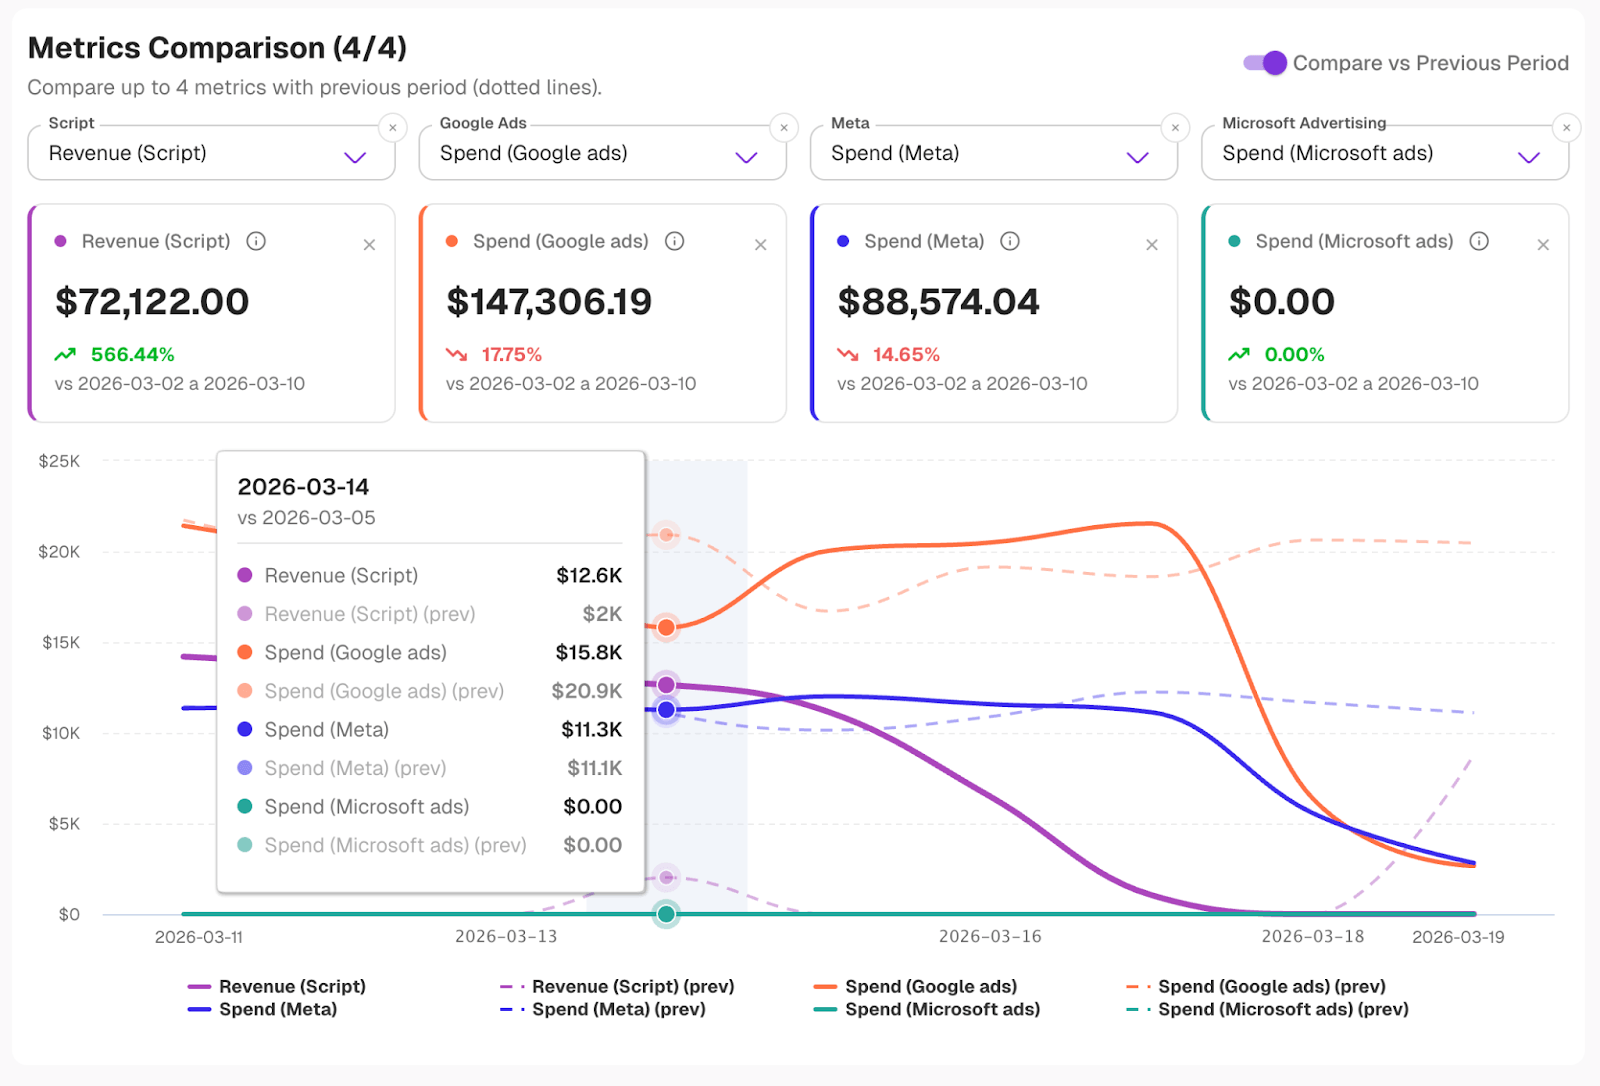
The script tracks how users interact with your site.
Your marketing integrations add campaign and spend data.
And your payment gateways, like Stripe or PayPal, connect everything to actual revenue.

When those pieces are in place, you stop looking at isolated metrics and start seeing the full picture.

You’ll begin to understand:

  • Which channels are actually driving revenue (not just clicks).
  • Which campaigns influence conversions over time.
  • How users move from first visit to purchase.
  • What’s worth scaling… and what isn’t.

That’s when things start to click.

Why This Step Matters More Than It Seems

It’s easy to treat this as just another setup step.

But it’s not.

This is the foundation for:

  • Attribution.
  • Optimization.
  • Budget decisions.
  • Growth strategy.

If the tracking isn’t accurate, everything built on top of it is off.

Taking a few minutes to set it up properly saves a lot of guesswork later.

To Sum It Up

Installing the GrowthOptix script on Webflow is simple, but it changes how you understand your business. It’s a small step that gives you real visibility into what’s working and what isn’t.

No extra tools. No complicated setup. Just clean, reliable tracking.

And once it’s in place, you’ll wonder how you were making decisions without it.

Frequently Asked Questions About GrowthOptix Setup

Do I need Google Tag Manager to install the GrowthOptix script on Webflow?
No. You can install the GrowthOptix script directly in Webflow using the Head Code section.

It’s the simplest and most reliable way to get started without adding extra complexity.
Is installing the script enough to get full attribution data?
The script is the foundation, but on its own it only tells part of the story.

To get a complete view, you should also connect your marketing integrations and your payment providers.
Which integrations should I connect for the best results?
At a minimum, connect your ad platforms like Google Ads, Meta, LinkedIn or TikTok.

These bring in campaign data and ad spend so you can understand performance beyond clicks.
Do I need to connect Stripe or PayPal as well?
Yes, if you want to understand revenue.

Connecting Stripe or PayPal allows GrowthOptix to tie attribution data directly to real payments, not just conversions or leads.
Is it safe to connect my payment providers to GrowthOptix?
Yes. GrowthOptix uses official, secure integrations with providers like Stripe and PayPal.

Your data is synced safely without altering or reinterpreting your source data.
How long does it take to set everything up?
Installing the script takes just a few minutes.

Connecting integrations may take a bit longer, but overall setup is quick and you’ll start seeing data shortly after.

Ready to Optimize Your Growth Strategy?

Join thousands of businesses using data-driven insights to accelerate their growth and maximize ROI.

No credit card required

Stop optimizing for Signups.

Start optimizing for Real Growth.

Join hundreds of SaaS companies who finally understand which marketing drives profitable growth.

Fai app interface with a search bar containing the text 'Forecast my ARR growth' and an arrow button on a dark purple background.
Table listing mediums CPS and Social with corresponding ROI, revenue, and trend percentages showing mixed upward and downward arrows.
Fai app interface with a search bar containing the text 'Forecast my ARR growth' and an arrow button on a dark purple background.
Table listing mediums CPS and Social with corresponding ROI, revenue, and trend percentages showing mixed upward and downward arrows.
GrowthOptix Inc, 600 B Street
San Diego, CA 92101
© 2026 GrowthOptix. All rights reserved.